


 52452
52452
Update: Your Zoom cloud recordings are now automatically added to your Kaltura account. Once the recording has processed in Zoom, you will see it in your Kaltura My Media page. This will allow you to retain your meeting recordings longer than the 120-day limit for Zoom's cloud space and you will be able to share the recording outside the Zoom area of your course.
The Zoom web-conferencing system is capable of recording Zoom Meetings on the cloud to permit easy access to Meeting recordings by students and instructors. Cloud recordings made from Meetings started from your Canvas course can be accessed by students through the Zoom integration within your course site. Due to recent temporary changes with Zoom's password settings, some cloud recordings of Meetings may have become inadvertently password protected, preventing students from accessing their lecture recordings and other essential course materials from within Canvas.
Password settings for Zoom cloud recordings can be changed from your Zoom account. This article will detail how to perform that process from within your Zoom account.
Remove the password for your Zoom cloud recordings
-
Go to fsu.zoom.us using your internet browser's address bar.

-
This will take you to FSU ITS' Zoom login page. This is where you can
access your Zoom account directly. Click the left-hand
Sign-In link.

-
Log into your FSU account using your FSUID and associated password if
prompted.

-
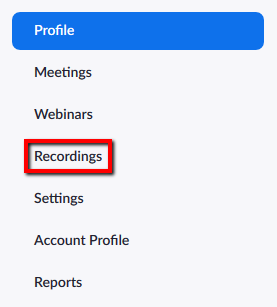
Once you are in your Zoom account menu, click the
Recordings link in the top-left of the screen.
-
This will take you into your Zoom Recording menu. Ensure that you are on
the Cloud Recordings page.

-
Within the Cloud Recordings page, locate the Meeting for which you would
like to alter recording password settings. Click the
Share button on that Meeting's row.

-
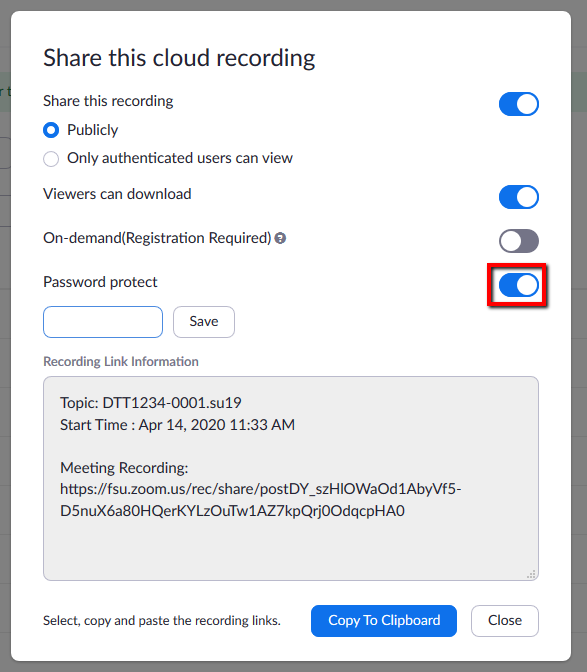
This will open up the Meeting Recording settings. Check to see if the
Password protect option is toggled on. If it is turned on, it will be
colored blue and switched to the right. To toggle it off, click
the blue switch on its right and ensure it has turned
grey.
-
Click the Close button at the bottom of the Recording
settings box. This will save your changes to the Meeting cloud recording
and allow students to access it from within their Canvas Zoom interface
without a password.

- Repeat the process for your other Zoom cloud recordings as necessary.


