


 1352
1352

Need some simple fixes to improve accessibility? The Office of Digital Learning has a series of tips for making course content more accessible. See the full series:
Easy Fix #1 - Image descriptions
Easy Fix #2 - Optimum color contrast
Easy Fix #3 - Descriptive document titles
Easy Fix #4 - Document headings
Easy Fix #5 - Converting Microsoft Word files to PDF
This “easy fix” is all about descriptive document titles: Meaningful titles help students navigate documents with greater speed and ease. Most screen readers announce titles as soon as a new document is opened. When titles are missing or only a repeat of the filename, visually impaired students have no way to make a quick distinction between one document and another. Choosing which file to engage becomes cumbersome and time consuming. Adding a missing title is one of the easiest steps you can take to improve the accessibility of your course documents.
How to Add a Missing Title
First, identify documents in your course site that have been flagged by Ally as missing titles: Open your Ally Course Report, scan the list of accessibility issues, and locate content labeled “The document is missing a title.” Once you click on the content affected, Ally provides a list of files that need attention.

Click on a file, and Ally will walk you through the steps for adding a document title. If the document is a PDF, the best way to add a title is to locate the original document. Let’s say the original file was a Microsoft Word document:
Adding Titles in Microsoft Word
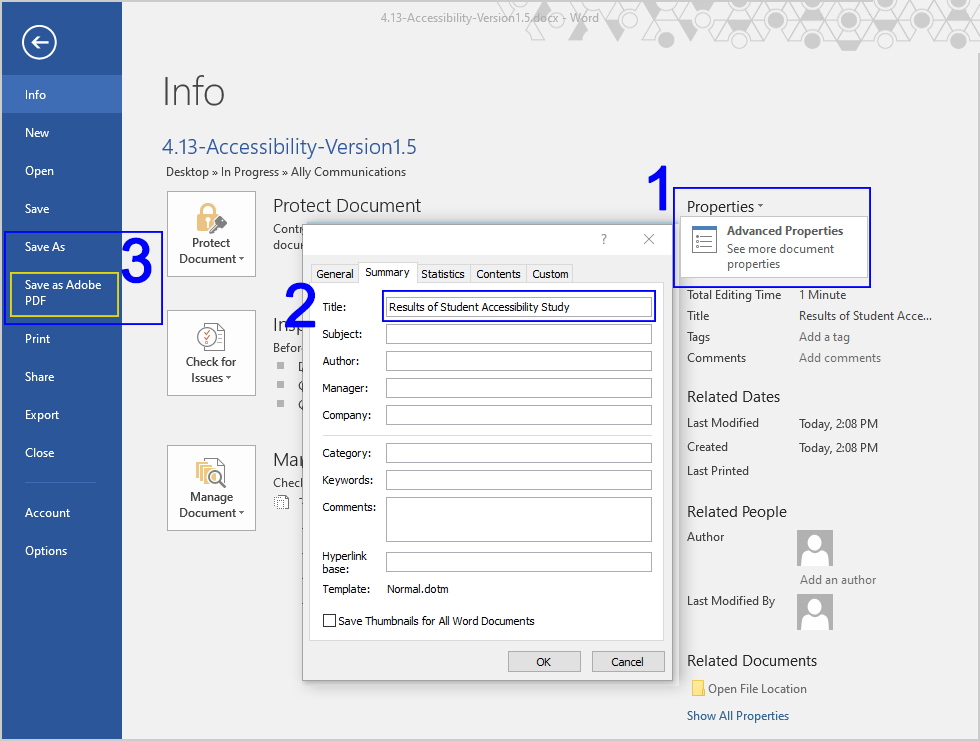
- Open the document and click File. From the Info tab, select Properties.
- In the Properties dialog, under the Summary tab, enter a document title. Try to enter a title that helps students understand the document’s general purpose or function. It should be more descriptive and convey more meaning than the filename alone. Click OK.
- From the blue navigation bar at the left, select Save as Adobe PDF.
Once your PDF is saved, follow Ally’s instructions to upload the replacement file. Ally will replace the old file and make sure any links to the file within the course are updated. You can also add titles directly within a PDF:
Adding Titles in PDFs
-
Open the file in Adobe Acrobat Pro. Select File from the dropdown menu and then Properties.
-
In the Document Properties dialog, select the Description tab and enter a descriptive title where indicated.

Click OK and save the PDF. Follow Ally’s instructions to upload the replacement file to your Canvas course site. Ally will replace the old file and make sure any links to it are updated.
New to Ally?
The Office of Digital Learning enabled the course accessibility tool Ally in all Canvas courses and organizational sites in December 2020. Ally simplifies the process of converting course materials into formats all students can access. Visit the Ally Resource Guide for access to Ally support resources, including webinars and one-on-one consultations.
Please don’t hesitate to contact the Office of Digital Learning if you have questions. Thank you for all you do to foster inclusive learning at FSU!
Questions? Visit us on the web at odl.fsu.edu, sign up for our newsletter, call 850-644-8004 Monday-Friday 8am-5pm, or submit a ticket to ODL Technical Support.


