 39475
39475
Use these quick links to skip to a particular article section:
How to access your Watermark Course Evaluations & Surveys (formerly EvaluationKIT) account
There are two ways to access your Watermark Course Evaluations & Surveys (formerly EvaluationKIT) account:
- Login directly via the following link: Watermark Course Evaluations & Surveys
Note: Your FSUID and password will be required to login. - Access via Canvas:
- Login to Canvas.
- On the global navigation menu that displays on the left, select Account.
- In the menu that appears, select Settings.
- On the left side of the page, select Course Evaluations.
Your Watermark Course Evaluations & Surveys (formerly EvaluationKIT) home page should look similar to the image in step 1 below. There may be slight variations in the layout of this page depending on how your CES (Course Evaluations & Surveys) administrator has configured your project widgets.
How to view your survey results
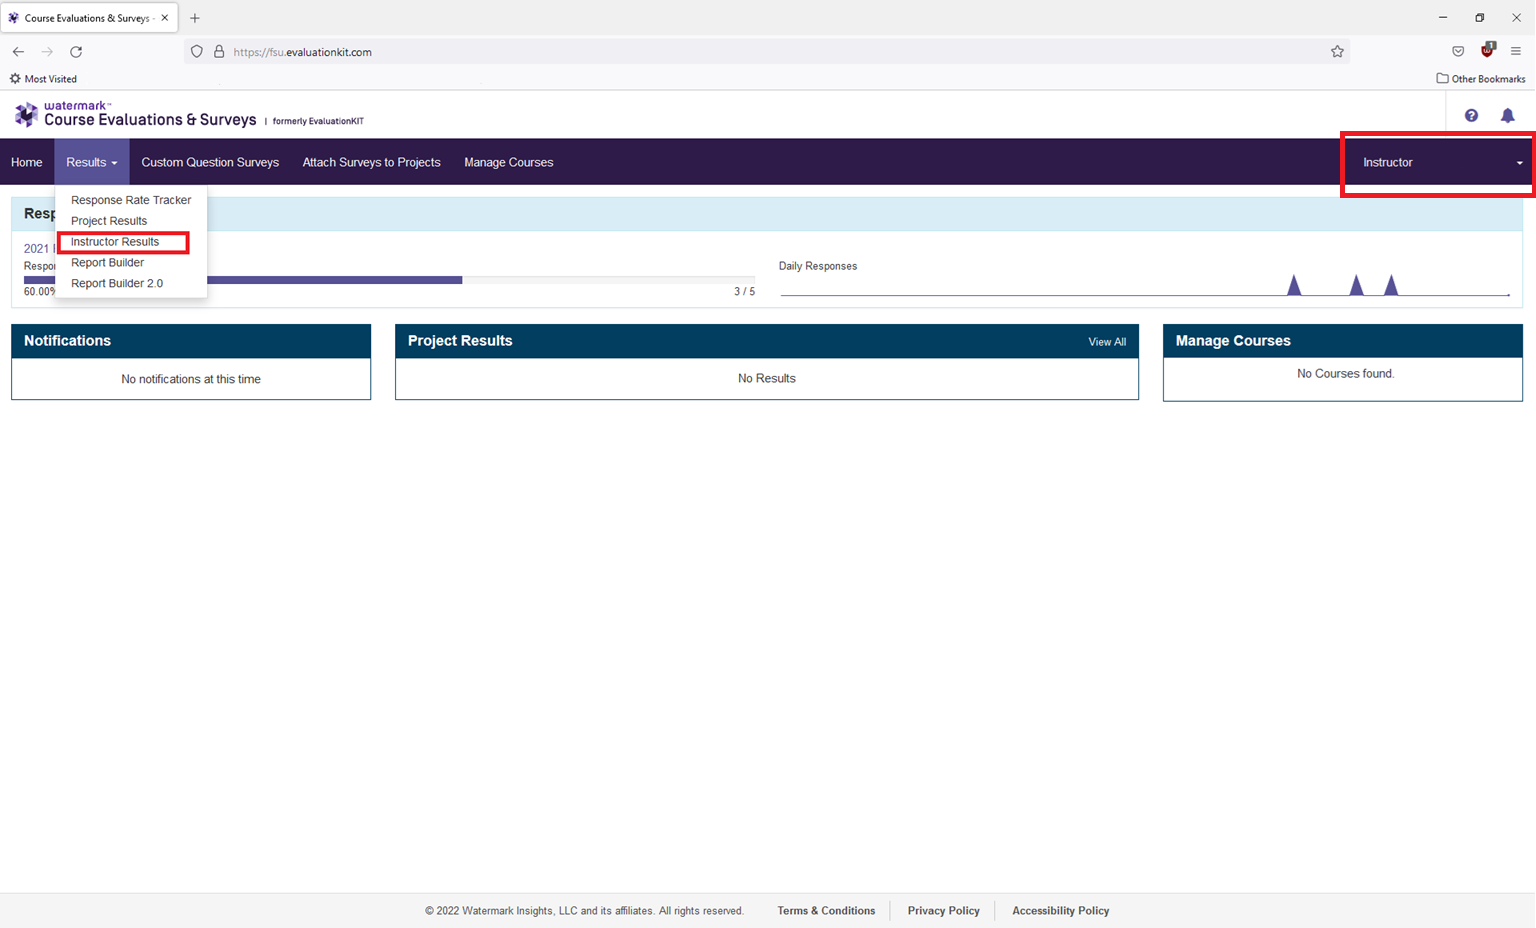
Step 1: Using the Results tab at the top of the screen, select the Instructor Results option. This will bring up a list of all evaluations you have permissions to view. Please note: to access your results you will need to ensure that you are using your instructor account. This can be chosen using the drop down at the top right side of your screen as indicated in this image.
Note: Administrators will be able to search by semester, instructor, and department that they have permissions for using the search bars at the top of the screen.

Displayed below is an example of the Admin search bar:

Step 2: If you would like to filter your results by semester, you can do so by using the project box. Click on the box and using the menu that pops up select the semester or semesters you would like to view. Use the select button to close the menu and then use the search button to filter your results.

If you would like to create more customized reports, you can do so by using the report builder detailed in the steps below.
How to combine sections into a single aggregate report
Step 1: Using the results tab at the top of the page, navigate to Project Results.
Step 2: Select the semester you wish to access results for.

Step 3: Using the tabs at the top of the page, select the By Course Section option. You can use the search bar to further refine your results if so desired. Using the check boxes, select the courses/sections you want combined into an aggregated report. Click the Batch Report button once you have checked all the desired courses/sections.

Step 4: Using the pop-up form, enter a name for your report. Select Short Report for the report type and Aggregate Data for Selected Items into One Report. After clicking the Go button you should receive an email notifying you that your report is ready to be downloaded along with a download link.

How to build a custom report using report builder
Step 1: Click the Results tab at the top of your screen. This will open a drop down menu with options on how to view project results. Select Report Builder.
Step 2: Click the + Create New Report button at the top of the page, or you can select a pre-existing report to edit its configuration.
Step 3: Enter a name and description for your report click the Continue button when you have done so.
Step 4: Select the project you wish to pull your results from using the check box on the left side of the screen. After you have selected your project(s), use the + Add Selected Projects button and then the Continue button to advance to the next step.
Step 5: Use the Select all or the check boxes along the left side of the screen to select which question/responses you would like to be included in your report.
Note: Please be sure to scroll down and check all questions have been selected as the Select all may not select write in questions by default.
Use the Continue button to proceed to the next step.
Step 6: The build query section of Report Builder will allow you to choose which results you see on your report. You can select to view responses based on college, course (or courses), or by instructor.
To select responses by college use the check boxes and the + Add Selected Areas button.
Step 7: To select responses by instructor use the Select Instructors button and use the search form on the pop up page to locate the desired instructor. Use the check boxes and the + Add Selected Instructors button to include their results in your report.
Step 8: To select responses by course code, use the Select Courses button and use the search form on the pop up page to locate the desired course or courses. Use the check boxes and the + Add Selected Courses button to include their results in your report.
Use the Continue button to proceed to the next step.
Step 9: Use the numbers to select the report template that you would like to use to display your results. A preview will appear along with a short description of each template. Click the Generate button when you have selected the desired template.
Note: We recommend using template 7 for most single course reporting purposes, as it will be most similar to reports that instructors have received in the past.
Step 10: Your report should be generated shortly. You can use the options at the top of the report to: show or hide selected questions, show or hide various response data on the report, export your report in .pdf or .xls format, or email your report.


